核心内容:
- 介绍了Google发布的Agent2Agent Protocol(A2A)及其功能特性。
- 阐述了A2A协议的原理,包括核心概念(AgentCard、Task、Artifact、Message、Part)和通信认证方式。
- 对比了A2A与MCP,分析了A2A在Agent互操作性方面的优势和定位。
源自 |筝瑜阿里云开发者 2025-04-18 08:30

本文主要介绍Google于2025年4月9日发布的Agent2Agent Protocol(简称“A2A”),这是一个旨在促进不同类型智能体(Agent)之间高效沟通与协作的开放协议。
序言
2025年4月9日,Google 正式发布了 Agent2Agent Protocol以下简称 “A2A”)。该协议为不同类型的智能体之间搭建了一座高效沟通与协作的桥梁,无论是独立Agent与独立Agent、独立Agent与企业Agent,亦或是企业Agent与企业Agent,都能借助该协议实现通信交互和事务协作。
A2A 为 Agent生态提供了一套标准协议标准,补充了 Agent生态基础设施中至关重要的一块拼图,将有力推动 Agent生态系统的完善与发展。
A2A 介绍
A2A 是一个用于链接不同封闭Agent,并实现其相互操作的开放协议。
1.1 A2A 诞生背景
目前为止,比较公认的一个观点是:2025年是 Agent元年。虽然说是元年,但是其爆发式的普及速度,远远超过了元年这个词的含义。所以,发展快是一个前提。
另外一点,Agent作为一个智能体,它本身具备自主性、主动性、社会性和反应性。其社会性
在以人为本构建的产品和服务的世界中,并不能快速的成长。
举一个简单的例子:人与人之间可以通过各种各样的方式沟通:对话,眼神,肢体动作,画作等,这些可以帮助不同的人之间相互了解对方,并做出正确的动作,共同推动人类社会的发展,那么Agent之间沟通协作呢?Google给出了自己的答案:A2A。
1.2 A2A 的功能特性
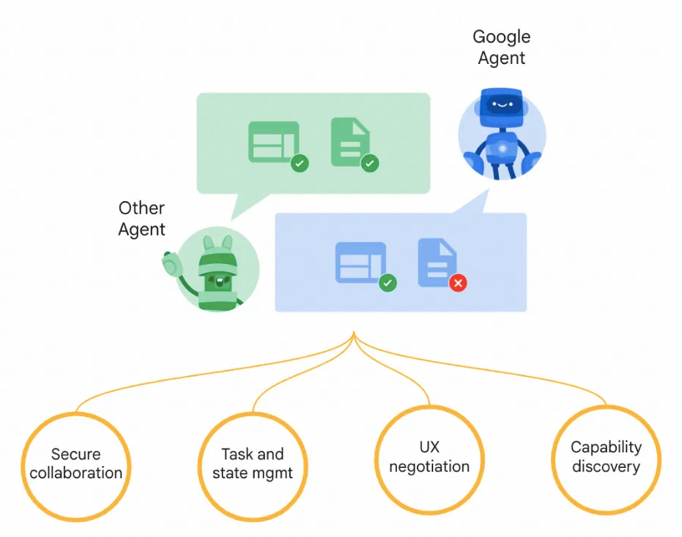
A2A作为一个开放协议,充分考虑了 Agent在和用户、企业打通的过程中所面临的一些挑战,其主要功能特性有以下四点:
-
安全协作(Secure Collaboration):通过引入认证/授权机制,保证 Agent之间的身份互信。
-
任务状态管理(Task and state mgmt):实现了 Agent之间互操作任务以及任务状态的可管理性。
-
用户体验协商(UX negotiation):不同的 Agent通过协商的方式,对用户提供无缝的体验。
-
功能发现(Capability discovery):提供了Agent之间相互发现各自能力的机制。
除此之外,A2A也在企业的无缝接入、简化集成方面,有比较好的考量。
A2A 协议原理
基本概念
核心三要素
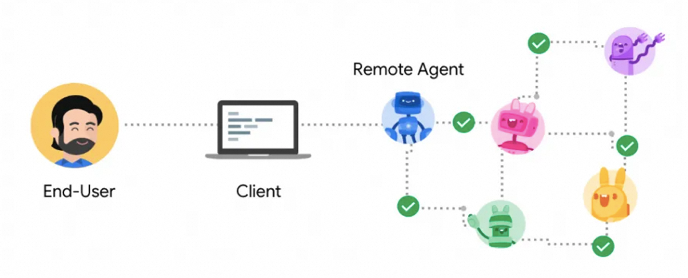
A2A中包含三个核心的参与者:
-
User
-
Client Agent
-
Remote Agent
User存在于协议中,主要的作用是用于 认证&授权。Client Agent指的是任务发起者,Server Agent
指的是任务的执行者。Client和 Server之间的通信,可以理解为就是一个个简单的请求和结果的响应,只不过这个请求是一个个的任务。一个 Agent既可以是 Client也可以是 Server。
核心概念
这里主要介绍一下,Client Agent和Server Agent交互的过程中,主要涉及到的一些Entity:AgentCard、Task、Artifact、Message、Part。
AgentCard
AgentCard是 Server Agent的名片,它主要描述了 Server Agent的能力、认证机制等信息。Client gent通过获取不同 Server Agent的 AgentCard,了解不同 Server Agent的能力,来决断具体的任务执行应该调用哪个 Server Agent。
内容示例:
 1
 2
 3
 4
 5
 6
 7
 8
 9
10
11
12
13
14
15
16
17
18
19
20
21
22
23
24
25
26
27
28
29
30
31
32
|
interface AgentCard {
  name: string;
  description: string;
  url: string;
  provider?: {
    organization: string;
    url: string;
  };
  version: string;
  documentationUrl?: string;
  capabilities: {
    streaming?: boolean;
    pushNotifications?: boolean;
    stateTransitionHistory?: boolean;
  };

  authentication: {
    schemes: string[];
    credentials?: string;
  };
  defaultInputModes: string[];
  defaultOutputModes: string[];
  skills: {
    id: string;
    name: string;
    description: string;
    tags: string[];
    examples?: string[];
    inputModes?: string[];
    outputModes?: string[];
  }[];
}
|
Task
Task是一个具有状态的实体,由Client Agent创建,其状态由Server Agent维护。一个Task用于达到特定的目标或者结果。Agent Client和Server Client在Task中交换Mesaage,Server Agent生成的结果叫做Artifact。
除此之外,每个Task有一个唯一的sessionId,多个Task可以使用一个sessionId,表明多个Task属于同一个会话的一部分。
示例:
 1
 2
 3
 4
 5
 6
 7
 8
 9
10
11
12
13
14
15
16
17
18
19
20
21
22
23
24
25
26
27
28
29
30
31
32
33
34
35
36
37
38
39
40
41
42
43
44
|
interface Task {
  id: string;
  sessionId: string;
  status: TaskStatus;
  history?: Message[];
  artifacts?: Artifact[];
  metadata?: Record<string, any>;
}

interface TaskStatus {
  state: TaskState;
  message?: Message;
  timestamp?: string;
}

interface TaskStatusUpdateEvent {
  id: string;
  status: TaskStatus;
  final: boolean; //indicates the end of the event stream
  metadata?: Record<string, any>;
}

interface TaskArtifactUpdateEvent {
  id: string;
  artifact: Artifact;
  metadata?: Record<string, any>;
}

interface TaskSendParams {
  id: string;
  sessionId?: string;
  message: Message;
  historyLength?: number;
  pushNotification?: PushNotificationConfig;
  metadata?: Record<string, any>; // extension metadata
}
type TaskState =
  | "submitted"
  | "working"
  | "input-required"
  | "completed"
  | "canceled"
  | "failed"
  | "unknown";
|
Artifact
Artifacts:Server Agent在执行任务后生成的目标结果叫做 Artifact,一个 Task可能生成一个或者多个 Artifact。
Artifacts是不可变的,可以命名,并且可以有多个部分。流式响应可以分批次,将结果附加到现有 Artifacts上。
1
2
3
4
5
6
7
8
9
|
interface Artifact {
  name?: string;
  description?: string;
  parts: Part[];
  metadata?: Record<string, any>;
  index: number;
  append?: boolean;
  lastChunk?: boolean;
}
|
Message
在 Task执行过程中,Server Agent和Client Agent之间是通过Message完成交流的,当然,这不包括Artifact。它可以包括:Agent的思考、用户上下文、指令、错误、状态或元数据。
一个Message可以包含多个Part,每个Part携带不同的内容。
示例:
1
2
3
4
5
|
interface Message {
  role: "user" | "agent";
  parts: Part[];
  metadata?: Record<string, any>;
}
|
Part
Part是 Message和 Artifact的核心组成部分,代表了其携带的主要内容。每个 Part都标识了内容类型和具体内容。
示例:
 1
 2
 3
 4
 5
 6
 7
 8
 9
10
11
12
13
14
15
16
17
18
19
20
21
22
|
interface TextPart {
  type: "text";
  text: string;
}
interface FilePart {
  type: "file";
  file: {
    name?: string;
    mimeType?: string;
    // oneof {
    bytes?: string; //base64 encoded content
    uri?: string;
    //}
  };
}
interface DataPart {
  type: "data";
  data: Record<string, any>;
}
type Part = (TextPart | FilePart | DataPart) & {
  metadata: Record<string, any>;
};
|
通信&认证
ClientAgent和ServerAgent之间通过HTTP协议进行通信,使用经典的C/S模式,支持SSE流式数据传输,数据格式为JSON-RPC2.0。
A2A遵循Open API规范进行身份验证。A2A不会在协议中交换身份信息。相反,它们会在带外获取材料(如令牌),并在HTTP头中传输。
2.3 核心流程
Client Agent和 Server Agent之间协同工作需要经过以下几个关键步骤:
-
Server Agent 在指定站点托管自己的 AgentCard;
-
Client Agent 主动发现 AgentCard;
-
Client Agent 发起一个 Task;
-
Client Agent 设置任务通知监听;
-
Server Agent 执行任务,返回 Artifact;
-
Client Agent 获取 Artifact。
AgentCard 托管 & 发现
官方建议将 AgentCard托管在 https://${host}/.well-known/agent.json。
上面这种方式叫做 Open Discovery,除此之外,还有另外两种方式:Curated Discovery 和 Private Discovery,详见:https://google.github.io/A2A/#/topics/agent_discovery
Agent Client可以通过请求https://${host}/.well-known/agent.json,获取到指定的 AgentCard
,并集成到自己的提示词或者工具集中。
 1
 2
 3
 4
 5
 6
 7
 8
 9
10
11
12
13
14
15
16
17
18
19
20
21
22
23
24
25
26
27
28
29
30
31
32
33
34
35
36
37
38
39
40
41
42
43
44
45
46
|
//agent card
{
  "name": "Google Maps Agent",
  "description": "Plan routes, remember places, and generate directions",
  "url": "https://maps-agent.google.com",
  "provider": {
    "organization": "Google",
    "url": "https://google.com"
  },
  "version": "1.0.0",
  "authentication": {
    "schemes": "OAuth2"
  },
  "defaultInputModes": ["text/plain"],
  "defaultOutputModes": ["text/plain", "application/html"],
  "capabilities": {
    "streaming": true,
    "pushNotifications": false
  },
  "skills": [
    {
      "id": "route-planner",
      "name": "Route planning",
      "description": "Helps plan routing between two locations",
      "tags": ["maps", "routing", "navigation"],
      "examples": [
        "plan my route from Sunnyvale to Mountain View",
        "what's the commute time from Sunnyvale to San Francisco at 9AM",
        "create turn by turn directions from Sunnyvale to Mountain View"
      ],
      // can return a video of the route
      "outputModes": ["application/html", "video/mp4"]
    },
    {
      "id": "custom-map",
      "name": "My Map",
      "description": "Manage a custom map with your own saved places",
      "tags": ["custom-map", "saved-places"],
      "examples": [
        "show me my favorite restaurants on the map",
        "create a visual of all places I've visited in the past year"
      ],
      "outputModes": ["application/html"]
    }
  ]
}
|
发起Task
允许客户端向远程代理发送内容,以启动新任务、恢复中断的任务或重新打开已完成的任务。
 1
 2
 3
 4
 5
 6
 7
 8
 9
10
11
12
13
14
15
16
|
{
  "jsonrpc": "2.0",
  "id": 1,
  "method":"tasks/send",
  "params": {
    "id": "de38c76d-d54c-436c-8b9f-4c2703648d64",
    "message": {
      "role":"user",
      "data": [{
        "type":"text",
        "text": "tell me a joke"
      }]
    },
    "metadata": {}
  }
}
|
设置ClientAgent任务状态监听
ClientAgent可以设置一个方法,给到 ServerAgent,当 ServerAgent修改 Task状态后,同步调用 ClientAgent的监听方法。
 1
 2
 3
 4
 5
 6
 7
 8
 9
10
11
12
13
14
15
16
17
18
19
20
21
22
23
24
25
26
27
28
29
|
//Request
{
  "jsonrpc": "2.0",
  "id": 1,
  "method":"tasks/pushNotification/set",
  "params": {
    "id": "de38c76d-d54c-436c-8b9f-4c2703648d64",
    "pushNotificationConfig": {
      "url": "https://example.com/callback",
      "authentication": {
        "schemes": ["jwt"]
      }
    }
  }
}
//Response
{
  "jsonrpc": "2.0",
  "id": 1,
  "result": {
    "id": "de38c76d-d54c-436c-8b9f-4c2703648d64",
    "pushNotificationConfig": {
      "url": "https://example.com/callback",
      "authentication": {
        "schemes": ["jwt"]
      }
    }
  }
}
|
执行 Task,返回结果
Server Agent执行任务,并以 Artifact的形式,返回结果。
 1
 2
 3
 4
 5
 6
 7
 8
 9
10
11
12
13
14
15
16
17
18
19
|
{
  "jsonrpc": "2.0",
  "id": 1,
  "result": {
    "id": "de38c76d-d54c-436c-8b9f-4c2703648d64",
    "sessionId": "c295ea44-7543-4f78-b524-7a38915ad6e4",
    "status": {
      "state": "completed",
    },
    "artifacts": [{
      "name":"joke",
      "parts": [{
          "type":"text",
          "text":"Why did the chicken cross the road? To get to the other side!"
        }]
      }],
    "metadata": {}
  }
}
|
获取 Artifact
这里需要注意的是,Client Agent需要通过获取 Task的方式,获取到Artifact
 1
 2
 3
 4
 5
 6
 7
 8
 9
10
11
12
13
14
15
16
17
18
19
20
21
22
23
24
25
26
27
28
29
30
31
32
33
34
35
36
37
38
39
40
41
|
//Request
{
  "jsonrpc": "2.0",
  "id": 1,
  "method":"tasks/get",
  "params": {
    "id": "de38c76d-d54c-436c-8b9f-4c2703648d64",
    "historyLength": 10,
    "metadata": {}
  }
}
//Response
{
  "jsonrpc": "2.0",
  "id": 1,
  "result": {
    "id": "de38c76d-d54c-436c-8b9f-4c2703648d64",
    "sessionId": "c295ea44-7543-4f78-b524-7a38915ad6e4",
    "status": {
      "state": "completed"
    },
    "artifacts": [{
      "parts": [{
        "type":"text",
        "text":"Why did the chicken cross the road? To get to the other side!"
      }]
    }],
    "history":[
      {
        "role": "user",
        "parts": [
          {
            "type": "text",
            "text": "tell me a joke"
          }
        ]
      }
    ],
    "metadata": {}
  }
}
|
A2A vs. MCP
如果没有 A2A ,只使用 MCP 是否也可以实现 Agent 之间的互相调用?答案肯定是可以的。那为什么还要有
A2A呢?
官方认为,A2A是 MCP的一个补充,相当于对子领域的一个增强。
我个人的看法是:MCP还是传统的工程思维,A2A则是站在人的思维来看待世界。
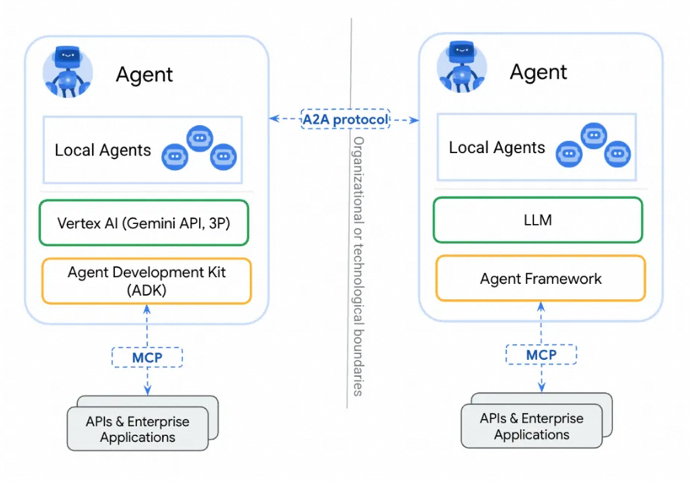
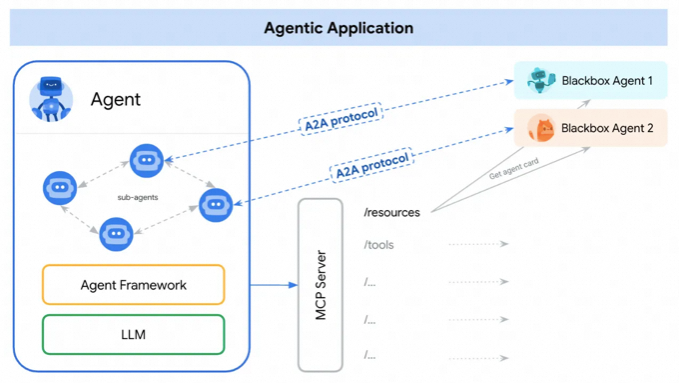
首先,我们要理解MCP的定位:提供一个规范的方式,向LLMs/Agent提供上下文。MCP强调的是LLMs/Agent为主体,MCPServer为附属的模式。而A2A强调的是Agent和Agent之间的相互操作,协议双端是对等的。
下面两个官方的图示,可以帮助大家理解A2A和MCP在工程领域的定位问题。
Agent-To-Agent
Agent-To-MCP-To-Agent
展望
Agent相互之间的发现、了解和交互调用,是一个发展趋势。首先,企业基于当前业务,都在探索、建立各种各样的
领域Agent 。在内部的各种 领域Agent之间的沟通协作,是必须要面对和解决的一个问题。
其次,对于对外提供 Agent服务的提供商来说,我如何让其他 Agent
主动发现我,就像SEO,吸引更多的流量,也是一个需要思考的问题。
参考资料:
[1]https://google.github.io/A2A/#/
[2]https://developers.googleblog.com/en/a2a-a-new-era-of-agent-interoperability/
[3]https://modelcontextprotocol.io/introduction