- pprof 使用方法:详细介绍了如何使用 pprof 进行 CPU、内存、阻塞、互斥锁和协程分析,并提供了实战案例。
- pprof 底层实现原理:深入源码,解析了 pprof 如何采集和存储各项性能指标,包括 CPU 采样、内存分配信息记录、阻塞信息上报等。
- 性能分析流程:串联了 pprof 中常用的性能分析流程,帮助读者更好地理解和使用 pprof 工具。
源自 | 小徐先生1212 小徐先生的编程世界 2025-04-26 08:28
前言
pprof 是 golang 中最常用的性能分析工具,本期我们来聊清楚两件事情:
- • pprof 该怎么用
- • pprof 底层是怎么实现的
本文涉及到一定的源码导读环节,使用的 golang 版本是 go1.21.4,操作系统是 linux.
实战 demo
1.1 前置准备
https://github.com/wolfogre/go-pprof-practice 是非常经典 go pprof 学习案例,本文将直接引用该项目作为性能分析的实战素材.
使用 linux 系统,提前安装好 graphviz(pprof 图形化展示时依赖的软件)
1
|
sudo apt install graphviz
|
先看一眼 go-pprof-practice 的 main 函数,其中有几个关键点
1
2
3
4
5
6
7
|
- 匿名导入了 net/http/pprof pkg

- 调用 runtime.SetMutexProfileFraction 和 runtime.SetBlockProfileRate,启用 block 和 mutex 性能分析(默认是关闭的)

- 异步启动默认的 http server(http.DefaultServerMux,与pprof联动)

- 循环调用一系列 animal 的 live 方法(里面已经提前埋设好一系列的性能炸弹,等待使用 pprof 将之一一逮捕)
|
 1
 2
 3
 4
 5
 6
 7
 8
 9
10
11
12
13
14
15
16
17
18
19
20
21
22
23
24
25
26
27
28
29
30
31
32
33
34
35
36
37
38
39
|
package main

import (
    "log"
    "net/http"
    // 启用 pprof 性能分析
    _ "net/http/pprof"
    "os"
    "runtime"
    "time"

    "github.com/wolfogre/go-pprof-practice/animal"
)

func main() {
    // ...

    runtime.GOMAXPROCS(1)
    // 启用 mutex 性能分析
    runtime.SetMutexProfileFraction(1)
    // 启用 block 性能分析
    runtime.SetBlockProfileRate(1)

    gofunc() {
        // 启动 http server. 对应 pprof 的一系列 handler 也会挂载在该端口下
        if err := http.ListenAndServe(":6060", nil); err != nil {
            log.Fatal(err)
        }
        os.Exit(0)
    }()

    // 运行各项动物的活动
    for {
        for _, v := range animal.AllAnimals {
            v.Live()
        }
        time.Sleep(time.Second)
    }
}
|
pprof页面总览
进入 http/pprof 页面:(端口与启动的 http server 一致)
1
|
http://localhost:6060/debug/pprof/
|
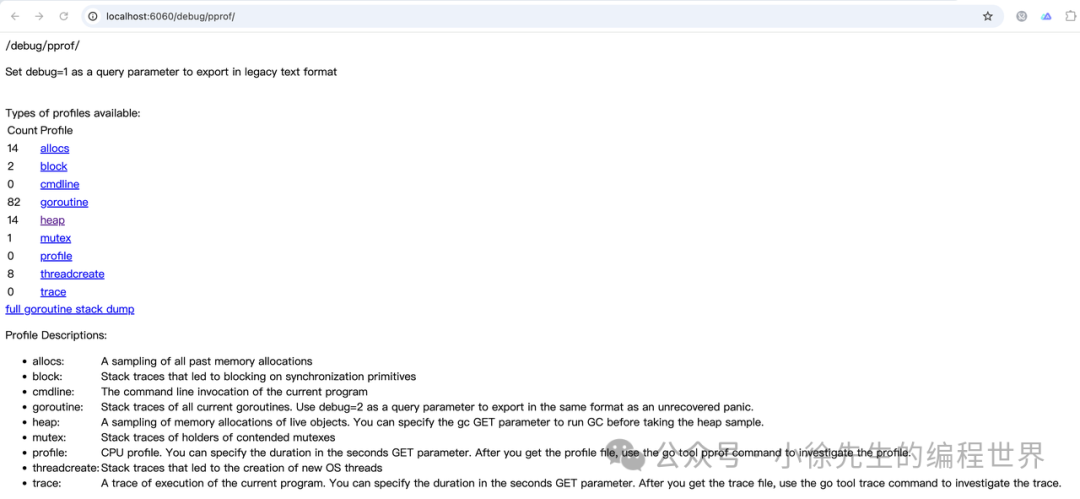
页面中包含各项内容,我们重点关注下面几项指标,下文中逐一展开分析:
cpu分析
cpu 分析是在一段时间内进行打点采样,通过查看采样点在各个函数栈中的分布比例,以此来反映各函数对 cpu 的占用情况.
点击页面上的 profile 后,默认会在停留 30S 后下载一个 cpu profile 文件. 通过交互式指令打开文件后,查看 cpu 使用情况:
 1
 2
 3
 4
 5
 6
 7
 8
 9
10
11
12
|
go tool  pprof {YOUR PROFILE PATH}


(pprof) top
Showing nodes accounting for 13510ms, 99.48% of 13580ms total
Dropped 30 nodes (cum <= 67.90ms)
      flat  flat%   sum%        cum   cum%
   13020ms 95.88% 95.88%    13510ms 99.48%  github.com/wolfogre/go-pprof-practice/animal/felidae/tiger.(*Tiger).Eat
     490ms  3.61% 99.48%      490ms  3.61%  runtime.asyncPreempt
         0     0% 99.48%    13520ms 99.56%  github.com/wolfogre/go-pprof-practice/animal/felidae/tiger.(*Tiger).Live
         0     0% 99.48%    13540ms 99.71%  main.main
         0     0% 99.48%    13540ms 99.71%  runtime.main
|
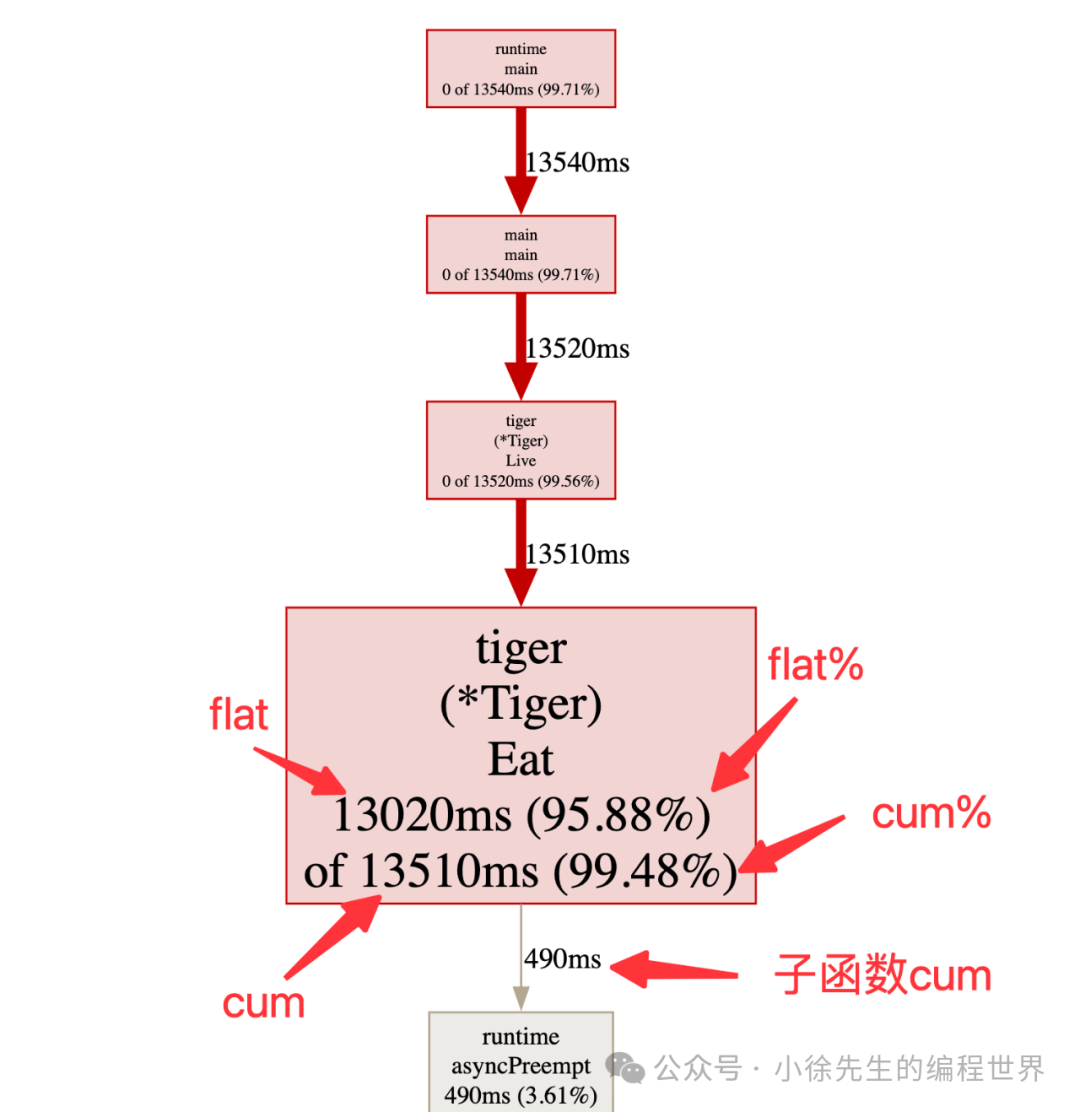
针对上述信息进行解释:
-
• 13510 ms——采样点大约覆盖了 13510 ms 的时长
-
• flat:某个函数执行时长(只聚焦函数本身,剔除子函数部分)
- •13020ms——Tiger.Eat 这个方法本身的调用时长
-
• flat%:某个函数执行时长(只聚焦函数本身,剔除子函数部分)
-
• sum%:某个函数及其之上父函数的总时长占比
-
• cum:某个函数及其子函数的总调用时长
- • 13510ms——Tiger.Eat 加上其调用子函数 runtime.asyncPreempt 的总时长
-
• cum%:某个函数及其子函数的调用时长在总时长中的占比
除此之外,还可以通过图形化界面来展示 cpu profile 文件中的内容:
1
|
go tool pprof -http=:8082 {YOUR PROFILE PATH}
|
如下图所示,在调用链的拓扑结构中,几项指标是和上述所介绍的内容一一对应的:
此外,由于部分同学对于火焰图使用比较习惯,这里也可以启用火焰图的格式: VIEW -> Flame Graph

在 CPU 性能分析中,要定位性能瓶颈可以核心看 flat% 这个指标,在这个案例中不难看出问题症结产生于 Tiger.Eat 函数,我们打开项目代码一探究竟:
1
2
3
4
5
6
7
|
func (t *Tiger) Eat() {
    log.Println(t.Name(), "eat")
    loop := 10000000000
    for i := 0; i < loop; i++ {
        // do nothing
    }
}
|
可以看到,作者在这里埋了个炸弹,通过 for 循环大量空转打满 CPU.
另外,这里我们主要注意到另一个细节,是 pprof 告诉我们 Tiger.Eat 中还有个子函数 runtime.asyncPreempt 花费了大约 490 ms 的时间,但是这一点在代码中并没有体现,这又是怎么回事呢? 这里我们需要简单介绍一下在 golang 中关于 goroutine 超时抢占机制的设定:
在 Tiger.Eat 方法中,由于只是简单的 for 循环空转无法走到检查点,因此这种协作式抢占无法生效
- • 非协作式抢占:在 go 1.14 之后,启用了基于信号量实现的非协作抢占机制. Monitor 探测到 g 超时会发送抢占信号,g 所属 m 收到信号后,会修改 g 的 栈程序计数器 pc 和栈顶指针 sp 为其注入 asyncPreempt 函数. 这样 g 会调用该函数完成 m 执行权的让渡
1
2
3
4
5
6
7
8
|
// 此时执行方是即将要被抢占的 g,这段代码是被临时插入的逻辑
func asyncPreempt2() {
    gp := getg()
    gp.asyncSafePoint = true
    // mcall 切换至 g0,然后完成 g 的让渡
    mcall(gopreempt_m)
    gp.asyncSafePoint = false
}
|
我在之前发布的文章:温故知新—Golang GMP 万字洗髓经
5.3 小节中对有关 g 超时抢占相关内容展开了详细的分析,大家感兴趣的话可以展开了解.
heap分析
下面是关于内存的分析流程,点击 heap 进入:
http://localhost:6060/debug/pprof/heap?debug=1
在页面的路径中能看到 debug 参数,如果 debug = 1,则将数据在页面上呈现;如果将 debug 设为 0,则会将数据以二进制文件的形式下载,并支持通过交互式指令或者图形化界面对文件内容进行呈现. block/mutex/goroutine 的机制也与此相同,后续章节中不再赘述.
在页面中获取到有关 heap 的信息:
1
2
3
4
5
6
|
heap profile: 1: 1291845632 [21: 3371171968] @ heap/1048576
1: 1291845632 [1: 1291845632] @ 0x104303b48 0x1043033b8 0x104303cc0 0x10410938c 0x10413ca24
#        0x104303b47        github.com/wolfogre/go-pprof-practice/animal/muridae/mouse.(*Mouse).Steal+0xf7        /Users/bytedance/projects/go-pprof-practice/animal/muridae/mouse/mouse.go:60
#        0x1043033b7        github.com/wolfogre/go-pprof-practice/animal/muridae/mouse.(*Mouse).Live+0x47        /Users/bytedance/projects/go-pprof-practice/animal/muridae/mouse/mouse.go:25
#        0x104303cbf        main.main+0xbf                                                                        /Users/bytedance/projects/go-pprof-practice/main.go:31
#        0x10410938b        runtime.main+0x2bb
|
先看上述内容第一行:
1
|
heap profile: 1: 1291845632 [21: 3371171968] @ heap/1048576
|
内容含义是在全局视角下的一些信息:
-
• 1—活跃对象个数
-
• 1291845632—活跃对象大小(单位 byte,总计约 1.2G)
-
• 21—历史至今所有对象个数
-
• 3371171968—历史至今所有对象总计大小(byte)
-
• 1048576—内存采样频率(约每 M 采样一次)
再看下面的内容:
1
2
3
4
5
|
1: 1291845632 [1: 1291845632] @ 0x104303b48 0x1043033b8 0x104303cc0 0x10410938c 0x10413ca24
#        0x104303b47        github.com/wolfogre/go-pprof-practice/animal/muridae/mouse.(*Mouse).Steal+0xf7        /Users/bytedance/projects/go-pprof-practice/animal/muridae/mouse/mouse.go:60
#        0x1043033b7        github.com/wolfogre/go-pprof-practice/animal/muridae/mouse.(*Mouse).Live+0x47        /Users/bytedance/projects/go-pprof-practice/animal/muridae/mouse/mouse.go:25
#        0x104303cbf        main.main+0xbf                                                                        /Users/bytedance/projects/go-pprof-practice/main.go:31
#        0x10410938b        runtime.main+0x2bb
|
对应为某个函数栈中的信息:
于是得以定位到问题症结所在是 Mouse.Steal 方法,此处在不断对 buffer 追加内容:
1
2
3
4
5
6
7
|
func (m *Mouse) Steal() {
    log.Println(m.Name(), "steal")
    max := constant.Gi
    for len(m.buffer)*constant.Mi < max {
        m.buffer = append(m.buffer, [constant.Mi]byte{})
    }
}
|
block分析
下面进行阻塞分析. 首先明确block分析的含义:
查看某个 goroutine 陷入 waiting 状态(被动阻塞,通常因 gopark 操作触发,比如因加锁、读chan条件不满足而陷入阻塞)的触发次数和持续时长.
pprof 默认不启用 block 分析,若要开启则需要进行如下设置:
1
|
runtime.SetBlockProfileRate(1)
|
此处的入参能够控制 block 采样频率:
下面点击页面中的 block,进入 http://localhost:6060/debug/pprof/block?debug=1 查看阻塞信息:
1
2
3
4
5
6
7
8
9
|
--- contention:
cycles/second=1000002977
                                                           /usr/local/go/src/runtime/proc.go:267
3002910915 3 @ 0x100052224 0x10027e9e4 0x10027e5d8 0x10027fb00 0x10008538c 0x1000b8a24
#        0x100052223        runtime.chanrecv1+0x13                                                                /usr/local/go/src/runtime/chan.go:442
#        0x10027e9e3        github.com/wolfogre/go-pprof-practice/animal/felidae/cat.(*Cat).Pee+0xa3        /Users/bytedance/projects/go-pprof-practice/animal/felidae/cat/cat.go:39
#        0x10027e5d7        github.com/wolfogre/go-pprof-practice/animal/felidae/cat.(*Cat).Live+0x37        /Users/bytedance/projects/go-pprof-practice/animal/felidae/cat/cat.go:19
#        0x10027faff        main.main+0xbf                                                                        /Users/bytedance/projects/go-pprof-practice/main.go:31
#        0x10008538b        runtime.main+0x2bb
|
于是我们定位到其中一处引起阻塞的代码是 Cat.Pee,每当函数被调用时会简单粗暴地等待 timer 1S,里面会因读 chan 而陷入阻塞:
1
2
3
4
5
|
func (c *Cat) Pee() {
    log.Println(c.Name(), "pee")

    <-time.After(time.Second)
}
|
mutex分析
mutex 分析看的是某个 goroutine 持有锁的时长(mutex.Lock -> mutex.Unlock 之间这段时间),且只有在存在锁竞争关系时才会上报这部分数据. pprof 默认不开启 mutex 分析,需要显式打开开关:
1
|
runtime.SetMutexProfileFraction(1)
|
入参控制的是 mutex 采样频率:
点击 mutex 进入 http://localhost:6060/debug/pprof/mutex?debug=1 页面查看信息:
1
2
3
4
5
6
|
--- mutex:
cycles/second=1000002767
sampling period=1
4007486874 4 @ 0x1024e24d4 0x1024e2495 0x10231ca24
#        0x1024e24d3        sync.(*Mutex).Unlock+0x73                                                                /usr/local/go/src/sync/mutex.go:223
#        0x1024e2494        github.com/wolfogre/go-pprof-practice/animal/canidae/wolf.(*Wolf).Howl.func1+0x34        /Users/bytedance/projects/go-pprof-practice/animal/canidae/wolf/wolf.go:58
|
于是定位到占有锁较多的方法是 Wolf.Howl,每次加锁后都睡了一秒:
 1
 2
 3
 4
 5
 6
 7
 8
 9
10
11
|
func (w *Wolf) Howl() {
    log.Println(w.Name(), "howl")

    m := &sync.Mutex{}
    m.Lock()
    go func() {
        time.Sleep(time.Second)
        m.Unlock()
    }()
    m.Lock()
}
|
goroutine分析
最后针对 goroutine 进行分析,点击 goroutine 进入:
http://localhost:6060/debug/pprof/goroutine?debug=1页面获取信息:
1
2
3
4
5
6
7
8
|
goroutine profile: total 173
150 @ 0x100a017e8 0x100a315ac 0x100bfa578 0x100a34a24
#        0x100a315ab        time.Sleep+0x10b                                                                        /usr/local/go/src/runtime/time.go:195
#        0x100bfa577        github.com/wolfogre/go-pprof-practice/animal/canidae/wolf.(*Wolf).Drink.func1+0x27        /Users/bytedance/projects/go-pprof-practice/animal/canidae/wolf/wolf.go:34

15 @ 0x100a017e8 0x100a315ac 0x100bfb6f0 0x100a34a24
#        0x100a315ab        time.Sleep+0x10b                                                                        /usr/local/go/src/runtime/time.go:195
#        0x100bfb6ef        github.com/wolfogre/go-pprof-practice/animal/muridae/mouse.(*Mouse).Pee.func1+0x2f        /Users/bytedance/projects/go-pprof-practice/animal/muridae/mouse/mouse.go:43
|
先看第一行:
1
|
goroutine profile: total 173
|
total 173——总计有 173 个 goroutine 然后能够定位到几个创造 goroutine 数量较大的方法:
1
2
3
4
5
6
7
|
150 @ 0x100a017e8 0x100a315ac 0x100bfa578 0x100a34a24
#        0x100a315ab        time.Sleep+0x10b                                                                        /usr/local/go/src/runtime/time.go:195
#        0x100bfa577        github.com/wolfogre/go-pprof-practice/animal/canidae/wolf.(*Wolf).Drink.func1+0x27        /Users/bytedance/projects/go-pprof-practice/animal/canidae/wolf/wolf.go:34

15 @ 0x100a017e8 0x100a315ac 0x100bfb6f0 0x100a34a24
#        0x100a315ab        time.Sleep+0x10b                                                                        /usr/local/go/src/runtime/time.go:195
#        0x100bfb6ef        github.com/wolfogre/go-pprof-practice/animal/muridae/mouse.(*Mouse).Pee.func1+0x2f        /Users/bytedance/projects/go-pprof-practice/animal/muridae/mouse/mouse.go:43
|
1
2
3
4
5
6
7
8
|
func (w *Wolf) Drink() {
    log.Println(w.Name(), "drink")
    for i := 0; i < 10; i++ {
        go func() {
            time.Sleep(30 * time.Second)
        }()
    }
}
|
 1
 2
 3
 4
 5
 6
 7
 8
 9
10
11
|
func (m *Mouse) Pee() {
    log.Println(m.Name(), "pee")
    go func() {
        time.Sleep(time.Second * 30)
        max := constant.Gi
        for len(m.slowBuffer)*constant.Mi < max {
            m.slowBuffer = append(m.slowBuffer, [constant.Mi]byte{})
            time.Sleep(time.Millisecond * 500)
        }
    }()
}
|
至此,我们把 pprof 中常用的性能分析流程串联了一遍,实战 demo 到此为止.
实现原理
下面进入 pprof 源码中探寻各项性能指标采集流程的实现原理.
pprof init
在实战案例中,我们注意到只需要匿名导入 pprof 包即可启用功能:
1
|
import (_ "net/http/pprof")
|
之所以如此,是因为在 pprof 包下通过的初始化函数,向 net/http 的默认 server——DefaultServerMux 中完成了一系列路径及对应 handler 的注册,我们重点关注下面两个:
 1
 2
 3
 4
 5
 6
 7
 8
 9
10
|
package pprof

func init() {
    // 目录页
    http.HandleFunc("/debug/pprof/", Index)
    // ...
    // cpu profile 采样
    http.HandleFunc("/debug/pprof/profile", Profile)
    // ...
}
|
cpu分析(profile)
首先来看看 cpu 分析流程,其实现原理是:
-
• 创建一个 timer,定时向 go 进程中的各个 thread 发送信号
-
• thread 接收到信号后,会将记录当前函数栈信息
-
• 通过一个异步 goroutine 持续接收函数栈信息,将其写入到 cpu profile 文件返回给用户
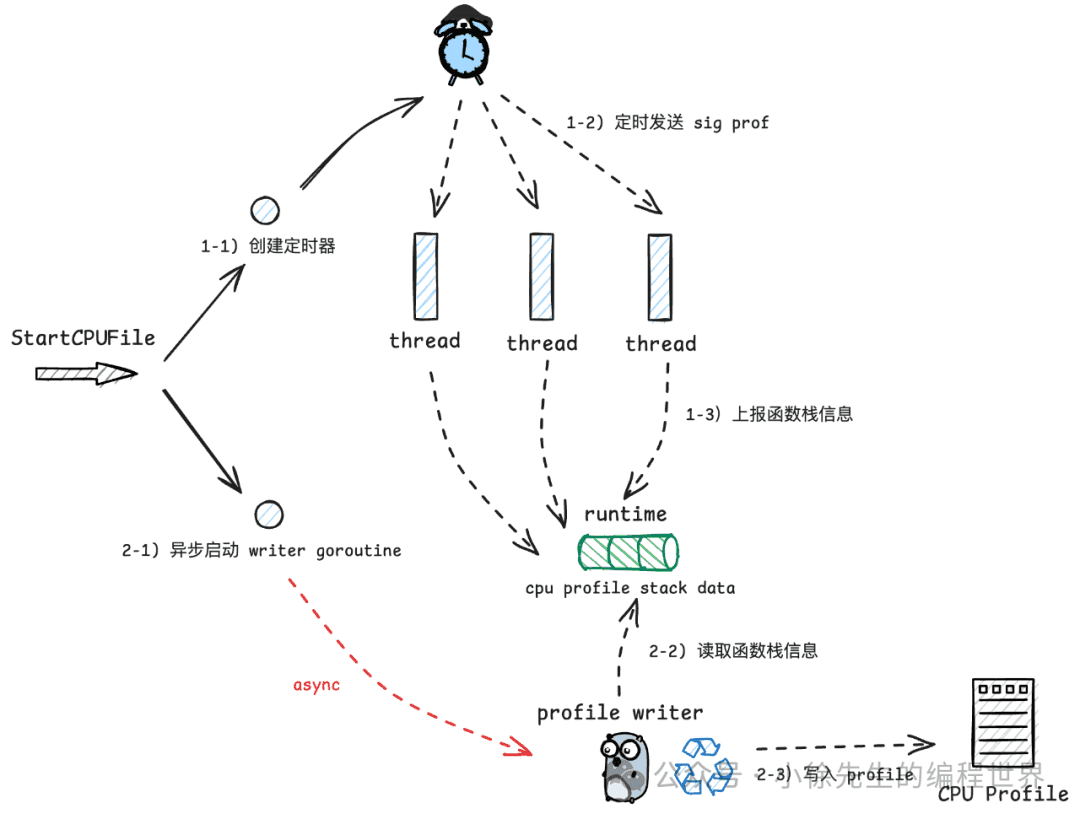
在具体实现上,该流程处理函数为路径 “/debug/pprof/profile” 对应的 handler——Profile:
 1
 2
 3
 4
 5
 6
 7
 8
 9
10
11
12
13
14
15
16
17
18
19
|
func Profile(w http.ResponseWriter, r *http.Request) {
    // ...
    // read seconds used to produce the profile
    sec, err := strconv.ParseInt(r.FormValue("seconds"), 10, 64)
    // default sec is 30S
    if sec <= 0 || err != nil {
        sec = 30
    }

    // ...
    // 开始统计
    if err := pprof.StartCPUProfile(w); err != nil {
        // ...
    }
    // 睡指定时长
    sleep(r, time.Duration(sec)*time.Second)
    // 停止统计
    pprof.StopCPUProfile()
}
|
在启动 cpu 统计的方法 StartCPUProfile 中:
 1
 2
 3
 4
 5
 6
 7
 8
 9
10
11
12
13
14
15
16
17
18
19
20
21
|
func StartCPUProfile(w io.Writer) error {
    // 定时器频率,每秒发送 100 次
    const hz = 100

    // 去重
    cpu.Lock()
    defer cpu.Unlock()
    if cpu.done == nil {
        cpu.done = make(chanbool)
    }
    // Double-check.
    if cpu.profiling {
        return fmt.Errorf("cpu profiling already in use")
    }
    cpu.profiling = true
    // 设置 cpuProfileRate 参数,方法内部会启动定时器
    runtime.SetCPUProfileRate(hz)
    // 启动写数据 goroutine
    go profileWriter(w)
    returnnil
}
|
接下来浏览一下创建 timer 发送信号的流程,对应信号类型为 SIGPROF,由 hz 控制发送的频率:
 1
 2
 3
 4
 5
 6
 7
 8
 9
10
11
12
13
14
15
16
17
18
19
20
21
22
23
24
25
26
27
28
29
30
31
32
33
34
35
36
37
38
39
40
41
42
43
44
45
46
47
48
49
50
51
52
53
54
55
|
func SetCPUProfileRate(hz int) {
    // 调整 hz 的阈值,在 [0,1000000] 之间
    if hz < 0 {
        hz = 0
    }
    if hz > 1000000 {
        hz = 1000000
    }

    // ...
    setcpuprofilerate(int32(hz))
    // ...
}

// setcpuprofilerate sets the CPU profiling rate to hz times per second.
// If hz <= 0, setcpuprofilerate turns off CPU profiling.
func setcpuprofilerate(hz int32) {
    // ...
    setThreadCPUProfiler(hz)
    // ...
}

func setThreadCPUProfiler(hz int32) {
    mp := getg().m
    mp.profilehz = hz

    // ...

    // hz 为 0 时直接退出
    if hz == 0 {
        // If the goal was to disable profiling for this thread, then the job's done.
        return
    }


    // hz 控制每秒发送多少次 SIGPROF 信号
    // 创建定时器
    spec := new(itimerspec)
    spec.it_value.setNsec(1 + int64(fastrandn(uint32(1e9/hz))))
    spec.it_interval.setNsec(1e9 / int64(hz))

    var timerid int32
    var sevp sigevent
    sevp.notify = _SIGEV_THREAD_ID
    sevp.signo = _SIGPROF
    sevp.sigev_notify_thread_id = int32(mp.procid)
    ret := timer_create(_CLOCK_THREAD_CPUTIME_ID, &sevp, &timerid)
    // ...

    ret = timer_settime(timerid, 0, spec, nil)
    // ...

    mp.profileTimer = timerid
    mp.profileTimerValid.Store(true)
}
|
至此,我们梳理了 SIGPROF 探测信号是如何发出的,下面我们就来看看信号是如何被处理的. 在 go 进程启动时,会针对信号注册好对应的处理函数,对应代码位于 runtime/proc.go:
1
2
3
4
5
6
7
8
|
func mstartm0() {
    // ...
    initsig(false)
}

func initsig(preinit bool) {
    setsig(i, abi.FuncPCABIInternal(sighandler))
}
|
信号处理函数 sighander 定义于 runtime/signal_unix.go,针对 SIGPROF 专门处理,其中读取并输出线程的函数栈信息:
 1
 2
 3
 4
 5
 6
 7
 8
 9
10
11
12
13
14
15
16
17
18
19
20
21
22
23
24
25
26
27
28
29
|
func sighandler(sig uint32, info *siginfo, ctxt unsafe.Pointer, gp *g) {
    // ...
    // 针对 pprof 信号进行处理
    if sig == _SIGPROF {
        // 针对 sigprof 信号进行去重
        if !delayedSignal && validSIGPROF(mp, c) {
            sigprof(c.sigpc(), c.sigsp(), c.siglr(), gp, mp)
        }
        return
    }
    // ...
}

func sigprof(pc, sp, lr uintptr, gp *g, mp *m) {
    // ...

    var u unwinder
    var stk [maxCPUProfStack]uintptr
    u.initAt(...)
    n += tracebackPCs(&u, 0, stk[n:])

    // ...

    if prof.hz.Load() != 0 {
        // ...
        traceCPUSample(gprof, pp, stk[:n])
    }
    getg().m.mallocing--
}
|
接下来再简单看一眼 writer goroutine 所做的事情:轮询读取函数栈信息,然后将其写入 cpu profile 文件:
 1
 2
 3
 4
 5
 6
 7
 8
 9
10
11
12
13
14
15
16
17
18
19
20
21
22
23
24
|
// readProfile, provided by the runtime, returns the next chunk of
// binary CPU profiling stack trace data, blocking until data is available.
// If profiling is turned off and all the profile data accumulated while it was
// on has been returned, readProfile returns eof=true.
// The caller must save the returned data and tags before calling readProfile again.
func readProfile() (data []uint64, tags []unsafe.Pointer, eof bool)

func profileWriter(w io.Writer) {
    b := newProfileBuilder(w)
    var err error
    for {
        time.Sleep(100 * time.Millisecond)
        data, tags, eof := readProfile()
        if e := b.addCPUData(data, tags); e != nil && err == nil {
            err = e
        }
        if eof {
            break
        }
    }
    // ...
    b.build()
    cpu.done <- true
}
|
通用 index 处理
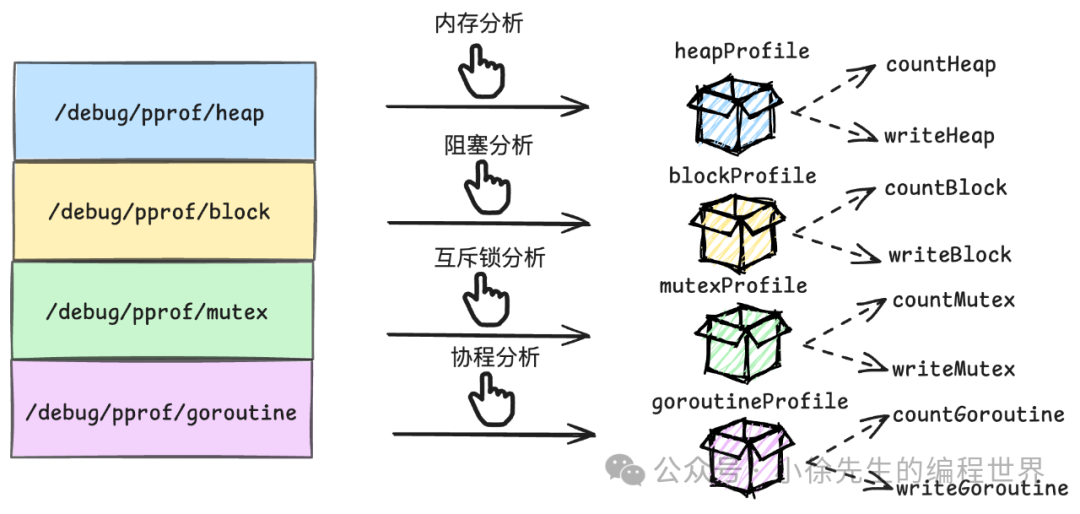
除了 cpu 分析外,接下来我们要聊到的 heap、block、mutex、goroutine 分析都是复用 “/debug/pprof/” 对应的 handler——Index:
1
2
3
4
|
func init() {
    http.HandleFunc("/debug/pprof/", Index)
    // ...
}
|
进入该 handler 后,会从请求路径中取出需要采集的指标类型,然后调用对应的 profile 模块进行处理:
 1
 2
 3
 4
 5
 6
 7
 8
 9
10
11
|
func Index(w http.ResponseWriter, r *http.Request) {
    // 获取访问的具体 index,如 heap、block、mutex、goroutine 等
    if name, found := strings.CutPrefix(r.URL.Path, "/debug/pprof/"); found {
        if name != "" {
            handler(name).ServeHTTP(w, r)
            return
        }
    }

    // ...
}
|
在 pprof 中,针对各类指标会提前初始化对应的 profile 处理模块,其中的 write 函数是用于输出采集信息的:
 1
 2
 3
 4
 5
 6
 7
 8
 9
10
11
12
13
14
15
16
17
18
19
20
21
22
23
24
25
26
27
28
29
30
31
32
33
34
35
36
37
38
39
40
41
42
|
func lockProfiles() {
    profiles.mu.Lock()
    if profiles.m == nil {
        // Initial built-in profiles.
        profiles.m = map[string]*Profile{
            "goroutine":    goroutineProfile,
            "threadcreate": threadcreateProfile,
            "heap":         heapProfile,
            "allocs":       allocsProfile,
            "block":        blockProfile,
            "mutex":        mutexProfile,
        }
    }
}

var goroutineProfile = &Profile{
    name:  "goroutine",
    count: countGoroutine,
    write: writeGoroutine,
}

// ...

var heapProfile = &Profile{
    name:  "heap",
    count: countHeap,
    write: writeHeap,
}

// ...

var blockProfile = &Profile{
    name:  "block",
    count: countBlock,
    write: writeBlock,
}

var mutexProfile = &Profile{
    name:  "mutex",
    count: countMutex,
    write: writeMutex,
}
|
在用户选择查看某种类型的指标信息时,便取出对应的 profile 模块,调用对应的 write 函数输出信息:
 1
 2
 3
 4
 5
 6
 7
 8
 9
10
11
12
13
14
15
16
17
18
19
20
21
22
|
func (name handler) ServeHTTP(w http.ResponseWriter, r *http.Request) {
    w.Header().Set("X-Content-Type-Options", "nosniff")
    p := pprof.Lookup(string(name))
    // ...
    gc, _ := strconv.Atoi(r.FormValue("gc"))
    if name == "heap" && gc > 0 {
        runtime.GC()
    }
    debug, _ := strconv.Atoi(r.FormValue("debug"))
    if debug != 0 {
        w.Header().Set("Content-Type", "text/plain; charset=utf-8")
    }
    // ...
    p.WriteTo(w, debug)
}

// Lookup returns the profile with the given name, or nil if no such profile exists.
func Lookup(name string) *Profile {
    lockProfiles()
    defer unlockProfiles()
    return profiles.m[name]
}
|
1
2
3
4
5
6
7
8
|
func (p *Profile) WriteTo(w io.Writer, debug int) error {
    // ...
    if p.write != nil {
        return p.write(w, debug)
    }

    // ...
}
|
heap、block、mutex 信息存储结构
针对于 heap、block、mutex 三类指标,对应信息都是提前生成好,存储在数据类型为 bucket 的全局变量当中,其中 bucket 类型定义成枚举值,包含 heap、block、mutex 三类:
1
2
3
4
5
6
7
8
9
|
const (
    // profile types
    memProfile bucketType = 1 + iota
    blockProfile
    mutexProfile
    // ...
)

type bucketType int
|
bucket 与 bucket 之间通过 allnext 指针串联形成链表,针对 heap、block、mutex 三种类型,在全局各有一个全局链表:
1
2
3
4
5
6
|
var (
    mbuckets atomic.UnsafePointer // *bucket, memory profile buckets
    bbuckets atomic.UnsafePointer // *bucket, blocking profile buckets
    xbuckets atomic.UnsafePointer // *bucket, mutex profile buckets
    // ...
)
|
下面查看关于 bucket 的具体定义,代码位于 runtime/mprof.go 文件中:
 1
 2
 3
 4
 5
 6
 7
 8
 9
10
11
12
|
type bucket struct {
    // ...
    // 指向链表相邻节点
    allnext *bucket
    // bucket 类型  memory、block、mutex
    typ     bucketType
    // ...
    // 只在 memory 类型使用,标识分配内存的大小
    size    uintptr
    // 记录栈信息数组的大小,通过地址偏移的方式即可获取到全部信息
    nstk    uintptr
}
|
事实上,每个 bucket 还存在一部分用于实际记录指标信息的隐藏内容,根据 bucket 类型的差异,可能是:
首先以 heapBucket 为例,我们查看下图:
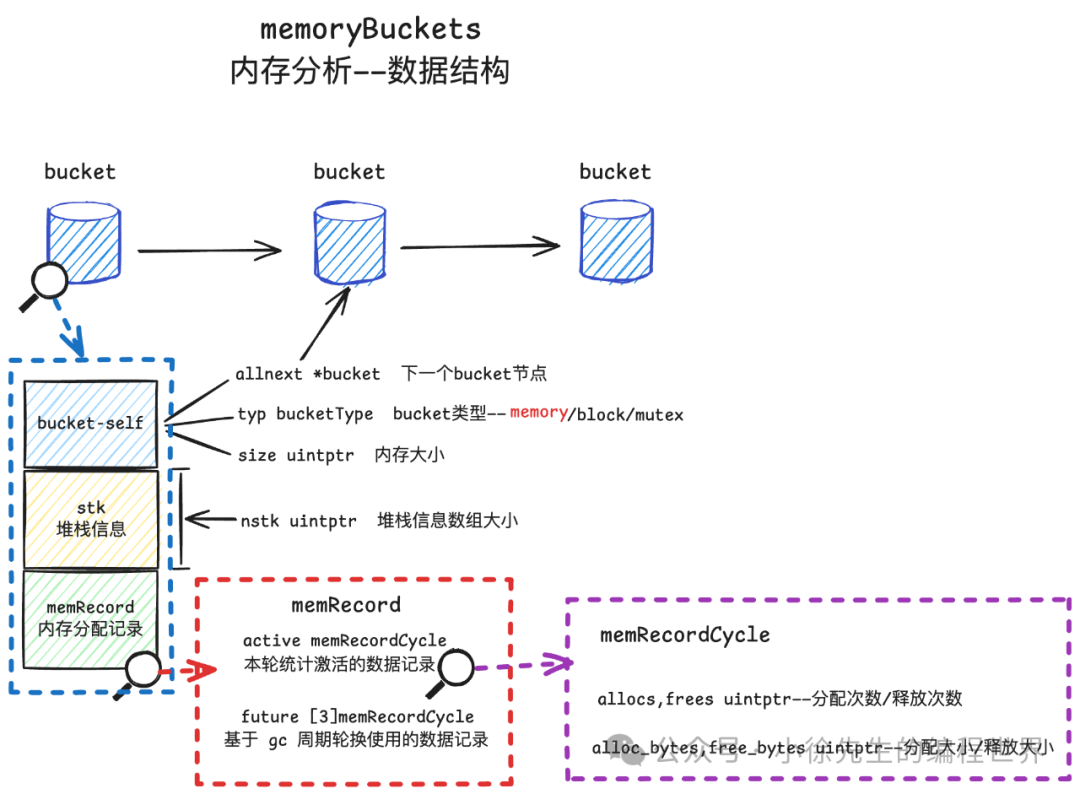
heapBucket 通过地址偏移的方式,能够取出 stk 堆栈信息数组以及 memRecord 实例的内容,其底层数据结构如下:
其中真正记录内存分配信息的数据结构是 memRecordCycle:
 1
 2
 3
 4
 5
 6
 7
 8
 9
10
11
12
13
14
15
16
17
18
19
20
21
22
23
24
25
26
27
28
29
30
31
32
33
34
35
36
37
38
39
40
41
42
43
44
45
46
47
48
49
50
51
52
53
54
55
56
57
58
59
60
61
62
63
64
65
|
type memRecord struct {
    // The following complex 3-stage scheme of stats accumulation
    // is required to obtain a consistent picture of mallocs and frees
    // for some point in time.
    // The problem is that mallocs come in real time, while frees
    // come only after a GC during concurrent sweeping. So if we would
    // naively count them, we would get a skew toward mallocs.
    //
    // Hence, we delay information to get consistent snapshots as
    // of mark termination. Allocations count toward the next mark
    // termination's snapshot, while sweep frees count toward the
    // previous mark termination's snapshot:
    //
    //              MT          MT          MT          MT
    //             .·|         .·|         .·|         .·|
    //          .·˙  |      .·˙  |      .·˙  |      .·˙  |
    //       .·˙     |   .·˙     |   .·˙     |   .·˙     |
    //    .·˙        |.·˙        |.·˙        |.·˙        |
    //
    //       alloc → ▲ ← free
    //               ┠┅┅┅┅┅┅┅┅┅┅┅P
    //       C+2     →    C+1    →  C
    //
    //                   alloc → ▲ ← free
    //                           ┠┅┅┅┅┅┅┅┅┅┅┅P
    //                   C+2     →    C+1    →  C
    //
    // Since we can't publish a consistent snapshot until all of
    // the sweep frees are accounted for, we wait until the next
    // mark termination ("MT" above) to publish the previous mark
    // termination's snapshot ("P" above). To do this, allocation
    // and free events are accounted to *future* heap profile
    // cycles ("C+n" above) and we only publish a cycle once all
    // of the events from that cycle must be done. Specifically:
    //
    // Mallocs are accounted to cycle C+2.
    // Explicit frees are accounted to cycle C+2.
    // GC frees (done during sweeping) are accounted to cycle C+1.
    //
    // After mark termination, we increment the global heap
    // profile cycle counter and accumulate the stats from cycle C
    // into the active profile.

    // active is the currently published profile. A profiling
    // cycle can be accumulated into active once its complete.
    active memRecordCycle

    // future records the profile events we're counting for cycles
    // that have not yet been published. This is ring buffer
    // indexed by the global heap profile cycle C and stores
    // cycles C, C+1, and C+2. Unlike active, these counts are
    // only for a single cycle; they are not cumulative across
    // cycles.
    //
    // We store cycle C here because there's a window between when
    // C becomes the active cycle and when we've flushed it to
    // active.
    future [3]memRecordCycle
}

// memRecordCycle
type memRecordCycle struct {
    allocs, frees           uintptr
    alloc_bytes, free_bytes uintptr
}
|
这里解释一下为什么需要使用 future 数组来轮换记录内存分配信息. 这是因为内存分配与 gc 回收是一个频繁交替的过程,为了避免记录数据的抖动,pprof 会针对经历过一轮 gc 周期的内存分配信息进行输出,于是便设计了这样一个 future 数组的结构,并通过递增的 gc 周期来计算得到 index 值并从 future 数组中取出对应的 memRecordCycle 实例.
对于 blockBucket 或者 mutexBucket,其底层都是使用的 blockRecord:
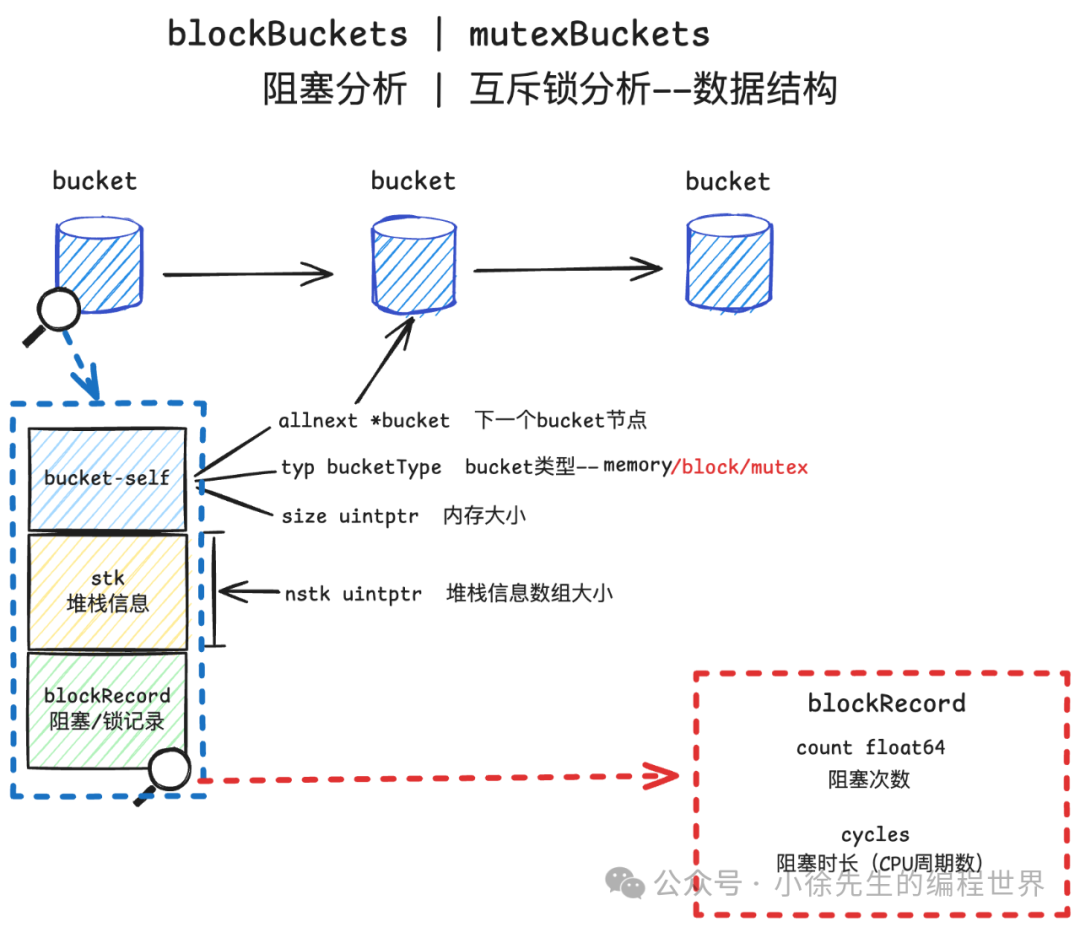
其中 blockRecord 结构定义比较简单,分别记录了发生阻塞/加锁的次数以及时长(以 cycle 为单位)
1
2
3
4
5
6
7
8
|
// A blockRecord is the bucket data for a bucket of type blockProfile,
// which is used in blocking and mutex profiles.
type blockRecord struct {
    // 阻塞次数
    count  float64
    // 阻塞的周期数
    cycles int64
}
|
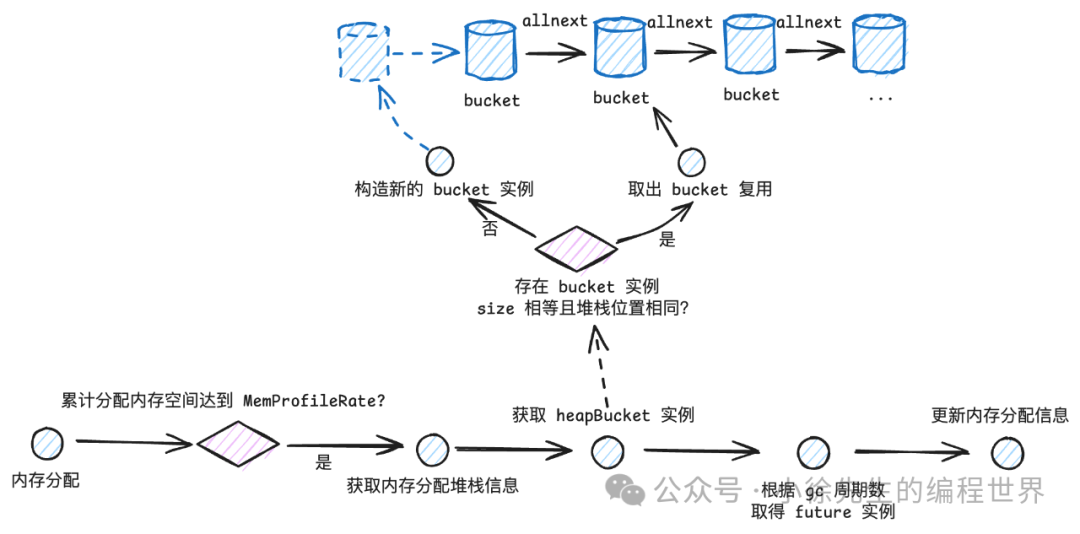
通用的 bucket 实例流程如下:
-
• 根据 bucketType 确定 bucket 类型
-
• 遍历相应类型的 bucket 链表,尝试复用 bucket 实例(如果 size 和堆栈位置一致,则可以复用相同 bucket 实例)
-
• 如果无法复用,则构造新的 bucket 实例,并且将其添加到全局的 bucket 链表当中
 1
 2
 3
 4
 5
 6
 7
 8
 9
10
11
12
13
14
15
16
17
18
19
20
21
22
23
24
25
26
27
28
29
30
31
32
33
|
// Return the bucket for stk[0:nstk], allocating new bucket if needed.
func stkbucket(typ bucketType, size uintptr, stk []uintptr, alloc bool) *bucket {
    // ...
    // 如果存在 bucket 实例承接的 size 以及 stk 堆栈位置一致的,则直接进行复用即可
    for b := (*bucket)(bh[i].Load()); b != nil; b = b.next {
        if b.typ == typ && b.hash == h && b.size == size && eqslice(b.stk(), stk) {
            unlock(&profInsertLock)
            return b
        }
    }

    // Create new bucket.
    b := newBucket(typ, len(stk))
    copy(b.stk(), stk)
    b.hash = h
    b.size = size

    var allnext *atomic.UnsafePointer
    if typ == memProfile {
        allnext = &mbuckets
    } elseif typ == mutexProfile {
        allnext = &xbuckets
    } else {
        allnext = &bbuckets
    }

    b.next = (*bucket)(bh[i].Load())
    b.allnext = (*bucket)(allnext.Load())

    // ...
    allnext.StoreNoWB(unsafe.Pointer(b))
    // ...
}
|
通过 newBucket 方法可以看到,每个 bucket 实例的总大小包含几部分:
正是基于这样的设计,才能够通过地址偏移的方式,取出堆栈数组 stk 或者 bucketRecord 实例.
 1
 2
 3
 4
 5
 6
 7
 8
 9
10
11
12
13
14
15
16
17
|
// newBucket allocates a bucket with the given type and number of stack entries.
func newBucket(typ bucketType, nstk int) *bucket {
    size := unsafe.Sizeof(bucket{}) + uintptr(nstk)*unsafe.Sizeof(uintptr(0))
    switch typ {
    default:
        throw("invalid profile bucket type")
    case memProfile:
        size += unsafe.Sizeof(memRecord{})
    case blockProfile, mutexProfile:
        size += unsafe.Sizeof(blockRecord{})
    }

    b := (*bucket)(persistentalloc(size, 0, &memstats.buckhash_sys))
    b.typ = typ
    b.nstk = uintptr(nstk)
    return b
}
|
内存分析(heap)
下面我们看看,有关内存分配信息是何时被上报写入到 bucket 当中的:
在 go 中,构造一切对象其底层都会途径到位于 runtime/malloc.go 文件的 mallocgc 方法. 在该方法中预留了一个上报桩点——当累计分配约 MemProfileRate(默认512KB)的内存时,会采样记录当次内存分配信息,步入到 profilealloc 方法中:
 1
 2
 3
 4
 5
 6
 7
 8
 9
10
11
12
13
14
15
16
17
18
|
// Allocate an object of size bytes.
// Small objects are allocated from the per-P cache's free lists.
// Large objects (> 32 kB) are allocated straight from the heap.
func mallocgc(size uintptr, typ *_type, needzero bool) unsafe.Pointer {
    // ...

    if rate := MemProfileRate; rate > 0 {
        // Note cache c only valid while m acquired; see #47302
        if rate != 1 && size < c.nextSample {
            c.nextSample -= size
        } else {
            profilealloc(mp, x, size)
        }
    }
   // ...

    return x
}
|
该流程最终会调用到位于 runtime/mprof.go 的 mProf_Malloc 方法:
-
• 调用 callers 方法获取到当前堆栈信息
-
• 读取 gc 周期数(全局变量——mProfCycle),确定使用的 memRecord future index
-
• 调用 stkbucket,获取一个 memBucket 实例
-
• 取出 memRecord 中指定 index 下的 memRecordCycle 实例
-
• 更新内存分配次数以及分配大小信息
 1
 2
 3
 4
 5
 6
 7
 8
 9
10
11
12
13
14
15
16
17
18
19
20
21
|
// Called by malloc to record a profiled block.
func mProf_Malloc(p unsafe.Pointer, size uintptr) {
    var stk [maxStack]uintptr
    nstk := callers(4, stk[:])

    index := (mProfCycle.read() + 2) % uint32(len(memRecord{}.future))

    b := stkbucket(memProfile, size, stk[:nstk], true)
    mp := b.mp()
    mpc := &mp.future[index]

    lock(&profMemFutureLock[index])
    mpc.allocs++
    mpc.alloc_bytes += size
    unlock(&profMemFutureLock[index])

    // ...
    systemstack(func() {
        setprofilebucket(p, b)
    })
}
|
另一方面,在临近一轮 gc 结束的清扫阶段,会调用 mProf_Free 方法,其中也会取出 memRecord 中对应于 gc 周期数的 memRecordCycle 实例,更新内存释放信息:
 1
 2
 3
 4
 5
 6
 7
 8
 9
10
11
12
|
// Called when freeing a profiled block.
func mProf_Free(b *bucket, size uintptr) {
    index := (mProfCycle.read() + 1) % uint32(len(memRecord{}.future))

    mp := b.mp()
    mpc := &mp.future[index]

    lock(&profMemFutureLock[index])
    mpc.frees++
    mpc.free_bytes += size
    unlock(&profMemFutureLock[index])
}
|
当用户点击 heap 进入到内存分析页面时,会步入 heapProfile 的 writeHeap 流程:
 1
 2
 3
 4
 5
 6
 7
 8
 9
10
11
12
13
14
15
16
17
18
19
20
21
22
23
24
25
26
27
|
var heapProfile = &Profile{
    name:  "heap",
    count: countHeap,
    write: writeHeap,
}

// writeHeap writes the current runtime heap profile to w.
func writeHeap(w io.Writer, debug int)error {
    return writeHeapInternal(w, debug, "")
}

func writeHeapInternal(w io.Writer, debug int, defaultSampleType string)error {
    var p []runtime.MemProfileRecord
    n, ok := runtime.MemProfile(nil, true)
    for {
        // Allocate room for a slightly bigger profile,
        // in case a few more entries have been added
        // since the call to MemProfile.
        p = make([]runtime.MemProfileRecord, n+50)
        n, ok = runtime.MemProfile(p, true)
        if ok {
            p = p[0:n]
            break
        }
        // Profile grew; try again.
    }
}
|
该流程会遍历每个 memBucket,根据 gc 周期数确定使用的 memRecordCycle Index(在 mProf_FlushLocked 方法中将指定 index 的 memRecordCycle 实例放到 active 容器中),然后获取到内存分配的信息进行汇总.
 1
 2
 3
 4
 5
 6
 7
 8
 9
10
11
12
13
14
15
16
17
18
19
20
21
22
23
24
25
26
27
28
29
30
31
32
33
34
35
36
37
38
|
func MemProfile(p []MemProfileRecord, inuseZero bool) (n int, ok bool) {
    cycle := mProfCycle.read()
    // If we're between mProf_NextCycle and mProf_Flush, take care
    // of flushing to the active profile so we only have to look
    // at the active profile below.
    index := cycle % uint32(len(memRecord{}.future))
    // ...
    mProf_FlushLocked(index)
    // ...
    if n <= len(p) {
        ok = true
        idx := 0
        for b := head; b != nil; b = b.allnext {
            mp := b.mp()
            if inuseZero || mp.active.alloc_bytes != mp.active.free_bytes {
                record(&p[idx], b)
                idx++
            }
        }
    }
    unlock(&profMemActiveLock)
    return
}

// mProf_FlushLocked flushes the events from the heap profiling cycle at index
func mProf_FlushLocked(index uint32) {
    assertLockHeld(&profMemActiveLock)
    assertLockHeld(&profMemFutureLock[index])
    head := (*bucket)(mbuckets.Load())
    for b := head; b != nil; b = b.allnext {
        mp := b.mp()
        // Flush cycle C into the published profile and clear
        // it for reuse.
        mpc := &mp.future[index]
        mp.active.add(mpc)
        *mpc = memRecordCycle{}
    }
}
|
block 分析
下面串一下 block 信息上报到 blockBucket 的流程:
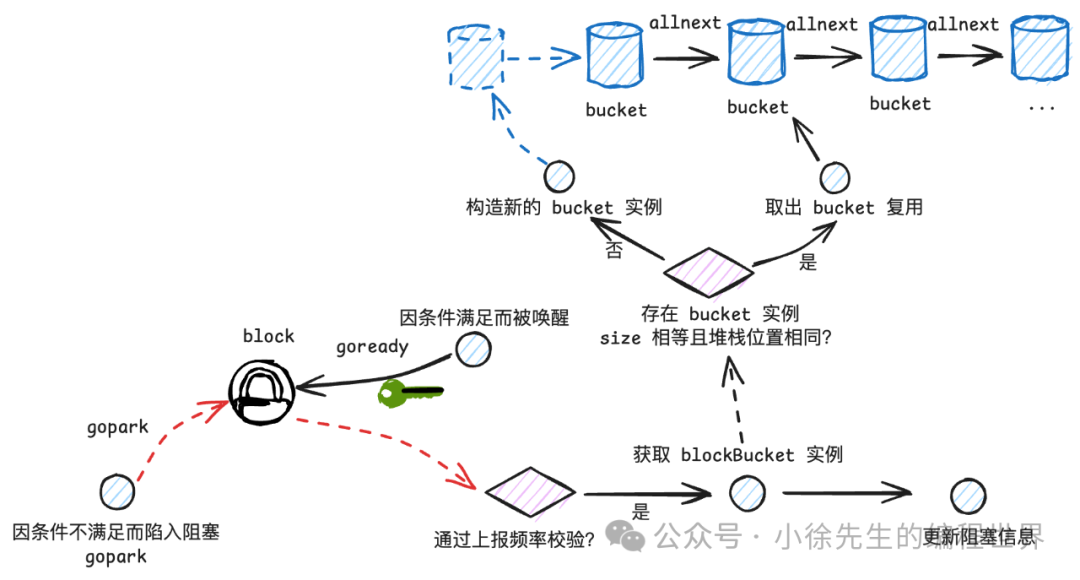
以 channel 为例,当某个 goroutine 读取一个空 channel 时会陷入阻塞(gopark),随后当有数据产生时,该 goroutine 得以唤醒,此时会调用预留的上报桩点(blockevent 函数)进行 block 信息上报. 对应代码位于 runtime/chan.go:
 1
 2
 3
 4
 5
 6
 7
 8
 9
10
11
12
13
14
15
16
17
18
19
20
21
22
23
24
|
// 读 channel
func chanrecv(c *hchan, ep unsafe.Pointer, block bool) (selected, received bool) {
    // ...
    // 因无数据可读而陷入阻塞
    gopark(chanparkcommit, unsafe.Pointer(&c.lock), waitReasonChanReceive, traceBlockChanRecv, 2)
    // 被唤醒
    // ...
    // 尝试记录上报 block 事件
    if mysg.releasetime > 0 {
        blockevent(mysg.releasetime-t0, 2)
    }
    // ...
}

func blockevent(cycles int64, skip int) {
    if cycles <= 0 {
        cycles = 1
    }

    rate := int64(atomic.Load64(&blockprofilerate))
    if blocksampled(cycles, rate) {
        saveblockevent(cycles, rate, skip+1, blockProfile)
    }
}
|
在 blockevent 中,调用 blocksampled 方法确定是否需要指定本次上报动作(呼应1.4小节中关于runtime.SetBlockProfileRate方法的调用设定):
1
2
3
4
5
6
7
8
|
// blocksampled returns true for all events where cycles >= rate. Shorter
// events have a cycles/rate random chance of returning true.
func blocksampled(cycles, rate int64) bool {
    if rate <= 0 || (rate > cycles && int64(fastrand())%rate > cycles) {
        return false
    }
    return true
}
|
当通过频控校验,确定要执行上报后,则进入 saveblockevent 方法:
-
• 调用 callers 方法取得堆栈信息 skt
-
• 调用 stkbucket 取得一个 blockBucket 实例
-
• 取出其中的 bucketRecord,更新阻塞信息
 1
 2
 3
 4
 5
 6
 7
 8
 9
10
11
12
13
14
15
16
17
18
19
20
21
22
23
24
25
26
|
func saveblockevent(cycles, rate int64, skip int, which bucketType) {
    gp := getg()
    var nstk int
    var stk [maxStack]uintptr
    if gp.m.curg == nil || gp.m.curg == gp {
        nstk = callers(skip, stk[:])
    } else {
        nstk = gcallers(gp.m.curg, skip, stk[:])
    }
    b := stkbucket(which, 0, stk[:nstk], true)
    bp := b.bp()

    lock(&profBlockLock)
    if which == blockProfile && cycles < rate {
        // Remove sampling bias, see discussion on http://golang.org/cl/299991.
        bp.count += float64(rate) / float64(cycles)
        bp.cycles += rate
    } elseif which == mutexProfile {
        bp.count += float64(rate)
        bp.cycles += rate * cycles
    } else {
        bp.count++
        bp.cycles += cycles
    }
    unlock(&profBlockLock)
}
|
当用户点击查看 block 信息时,则走入到 blockProfile 的 writeBlock 流程:
 1
 2
 3
 4
 5
 6
 7
 8
 9
10
11
12
13
14
15
16
17
18
19
20
21
22
23
24
25
26
|
var blockProfile = &Profile{
    name:  "block",
    count: countBlock,
    write: writeBlock,
}

// writeBlock writes the current blocking profile to w.
func writeBlock(w io.Writer, debug int)error {
    return writeProfileInternal(w, debug, "contention", runtime.BlockProfile)
}

// writeProfileInternal writes the current blocking or mutex profile depending on the passed parameters.
func writeProfileInternal(w io.Writer, debug int, name string, runtimeProfile func([]runtime.BlockProfileRecord) (int, bool)) error {
    var p []runtime.BlockProfileRecord
    n, ok := runtimeProfile(nil)
    for {
        p = make([]runtime.BlockProfileRecord, n+50)
        n, ok = runtimeProfile(p)
        if ok {
            p = p[:n]
            break
        }
    }

    // ...
}
|
该流程底层会调用到 BlockProfile 方法,其中遍历了 blockBuckets 链表,最终完成 block 信息的输出:
 1
 2
 3
 4
 5
 6
 7
 8
 9
10
11
12
13
14
15
16
17
18
19
20
21
22
23
24
25
26
27
28
29
30
31
32
33
34
35
36
|
// BlockProfile returns n, the number of records in the current blocking profile.
// If len(p) >= n, BlockProfile copies the profile into p and returns n, true.
// If len(p) < n, BlockProfile does not change p and returns n, false.
//
// Most clients should use the runtime/pprof package or
// the testing package's -test.blockprofile flag instead
// of calling BlockProfile directly.
func BlockProfile(p []BlockProfileRecord) (n int, ok bool) {
    lock(&profBlockLock)
    head := (*bucket)(bbuckets.Load())
    for b := head; b != nil; b = b.allnext {
        n++
    }
    if n <= len(p) {
        ok = true
        for b := head; b != nil; b = b.allnext {
            bp := b.bp()
            r := &p[0]
            r.Count = int64(bp.count)
            // Prevent callers from having to worry about division by zero errors.
            // See discussion on http://golang.org/cl/299991.
            if r.Count == 0 {
                r.Count = 1
            }
            r.Cycles = bp.cycles
            // ...
            i := copy(r.Stack0[:], b.stk())
            for ; i < len(r.Stack0); i++ {
                r.Stack0[i] = 0
            }
            p = p[1:]
        }
    }
    unlock(&profBlockLock)
    return
}
|
2.7 mutex 分析
mutex 与 block 的流程比较类似,区别在于上报时机是在解锁的 mutex.Unlock 方法中:
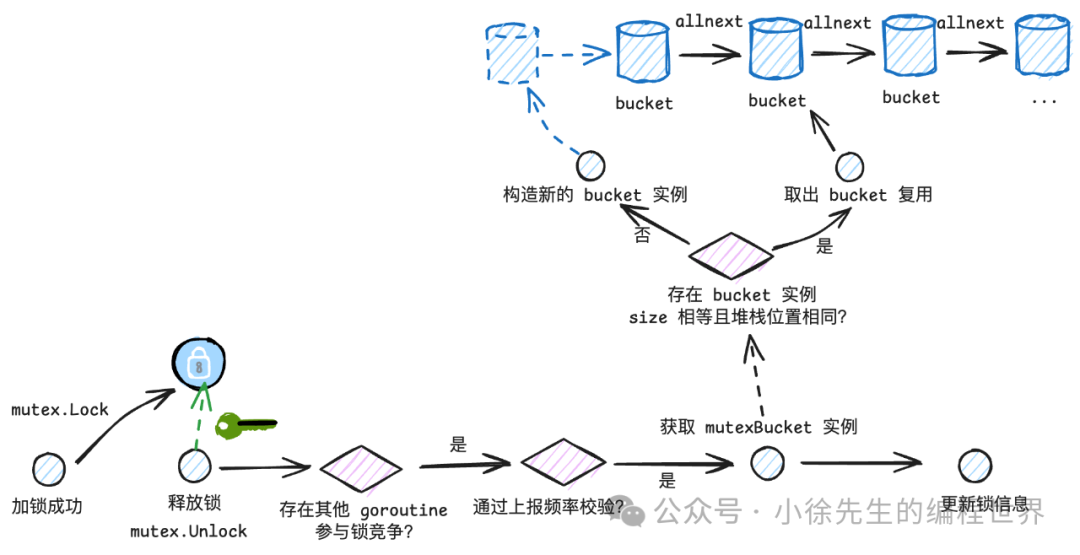
Mutex 解锁方法代码位于 sync/mutex.go,值得一提的是,只有在存在锁竞争关系(有其他 goroutine 尝试抢锁)时,才会步入到 unlockSlow 方法中,其中才会存在 mutex 事件上报桩点:
1
2
3
4
5
6
7
8
9
|
func (m *Mutex) unlockSlow(new int32) {
    runtime_Semrelease(&m.sema, ...)
}

func semrelease1(addr *uint32, handoff bool, skipframes int) {
    // ...
    mutexevent(t0-acquiretime, 3+skipframes)
    // ...
}
|
在 mutexevent 方法中能看到呼应于 1.5 小节中 runtime.SetMutexProfileFraction(1) 设定的内容:
 1
 2
 3
 4
 5
 6
 7
 8
 9
10
11
12
|
//go:linkname mutexevent sync.event
func mutexevent(cycles int64, skip int) {
    if cycles < 0 {
        cycles = 0
    }
    rate := int64(atomic.Load64(&mutexprofilerate))
    // TODO(pjw): measure impact of always calling fastrand vs using something
    // like malloc.go:nextSample()
    if rate > 0 && int64(fastrand())%rate == 0 {
        saveblockevent(cycles, rate, skip+1, mutexProfile)
    }
}
|
后续走到 saveblockevent 流程与 block 相似,不再赘述.
读取 mutex 信息的流程入口是 mutexProfile 的 writeMutex 方法:
 1
 2
 3
 4
 5
 6
 7
 8
 9
10
|
var mutexProfile = &Profile{
    name:  "mutex",
    count: countMutex,
    write: writeMutex,
}

// writeMutex writes the current mutex profile to w.
func writeMutex(w io.Writer, debug int) error {
    return writeProfileInternal(w, debug, "mutex", runtime.MutexProfile)
}
|
其中会遍历所有 mutexBucket,取得对应的加锁信息并汇总输出:
 1
 2
 3
 4
 5
 6
 7
 8
 9
10
11
12
13
14
15
16
17
18
19
20
21
22
23
|
func MutexProfile(p []BlockProfileRecord) (n int, ok bool) {
    lock(&profBlockLock)
    head := (*bucket)(xbuckets.Load())
    for b := head; b != nil; b = b.allnext {
        n++
    }
    if n <= len(p) {
        ok = true
        for b := head; b != nil; b = b.allnext {
            bp := b.bp()
            r := &p[0]
            r.Count = int64(bp.count)
            r.Cycles = bp.cycles
            i := copy(r.Stack0[:], b.stk())
            for ; i < len(r.Stack0); i++ {
                r.Stack0[i] = 0
            }
            p = p[1:]
        }
    }
    unlock(&profBlockLock)
    return
}
|
goroutine 分析

最后来到 goroutine 分析流程,比较简单,直接取得 g 的数量并且遍历各个 g 的栈信息即可:
 1
 2
 3
 4
 5
 6
 7
 8
 9
10
11
12
13
14
15
16
17
18
19
20
21
22
23
24
25
|
var goroutineProfile = &Profile{
    name:  "goroutine",
    count: countGoroutine,
    write: writeGoroutine,
}

// writeGoroutine writes the current runtime GoroutineProfile to w.
func writeGoroutine(w io.Writer, debug int)error {
    // ...
    return writeRuntimeProfile(w, debug, "goroutine", runtime_goroutineProfileWithLabels)
}

//go:linkname runtime_goroutineProfileWithLabels runtime/pprof.runtime_goroutineProfileWithLabels
func runtime_goroutineProfileWithLabels(p []StackRecord, labels []unsafe.Pointer) (n int, ok bool) {
    return goroutineProfileWithLabels(p, labels)
}

// labels may be nil. If labels is non-nil, it must have the same length as p.
func goroutineProfileWithLabels(p []StackRecord, labels []unsafe.Pointer) (n int, ok bool) {
    if labels != nil && len(labels) != len(p) {
        labels = nil
    }

    return goroutineProfileWithLabelsConcurrent(p, labels)
}
|
获取 goroutine 信息的底层方法是 goroutineProfileWithLabelsConcurrent:
 1
 2
 3
 4
 5
 6
 7
 8
 9
10
11
12
13
14
15
16
17
18
19
20
21
22
23
24
25
26
27
28
29
30
31
32
33
34
35
36
37
38
39
40
41
42
43
44
|
var goroutineProfile = struct {
    sema    uint32
    active  bool
    offset  atomic.Int64
    records []StackRecord
    labels  []unsafe.Pointer
}{
    sema: 1,
}


func goroutineProfileWithLabelsConcurrent(p []StackRecord, labels []unsafe.Pointer) (n int, ok bool) {
    // ...
    // 获得 g 的总数. 通过全局变量 allggen 以及 allp 中的 freeg 计算获得
    n = int(gcount())
    // ...
    goroutineProfile.active = true
    goroutineProfile.records = p
    goroutineProfile.labels = labels

    // 通过 p 承载各个 g 的栈信息
    if fing != nil {
        fing.goroutineProfiled.Store(goroutineProfileSatisfied)
        if readgstatus(fing) != _Gdead && !isSystemGoroutine(fing, false) {
            doRecordGoroutineProfile(fing)
        }
    }
    // ...
}


func gcount()int32 {
    n := int32(atomic.Loaduintptr(&allglen)) - sched.gFree.n - sched.ngsys.Load()
    for _, pp := range allp {
        n -= pp.gFree.n
    }

    // All these variables can be changed concurrently, so the result can be inconsistent.
    // But at least the current goroutine is running.
    if n < 1 {
        n = 1
    }
    return n
}
|
至此,正文结束!
3 总结
本篇通过实战 demo 以及串联底层源码的方式,和大家探讨了 go 中的性能分析工具——pprof:
-
• Cpu 分析:
-
• 启动定时器 timer,定期向各个 thread 发送 SIGPROF 信号
-
• 处理 SIGPROF 信号时记录函数栈信息,通过这种抽样的方式反映各个函数对 CPU 占用情况
-
• Heap 分析:
-
• 每分配指定大小的内存,就会采样一笔内存分配信息并记录在全局变量 memBlock 中
-
• 每轮 gc 结束前,同样在 memBlock 中记录内存释放信息
-
• 读取内存指标时,遍历各个 memBucket 加载结果返回
-
• Block 分析:
-
• 根据传参确定采集频率,在 goroutine 阻塞并被重新唤醒后进行阻塞信息上报,将其存储在全局变量 blockBucket 中
-
• 读取block指标时,遍历各个 blockBucket 加载结果返回
-
• Mutex 分析:
-
• 根据传参确定采集频率,在解锁前上报加锁时长信息,存储在全局变量 mutexBucket 中
-
• 读取mutex指标时,遍历各个 mutexBucket 加载结果返回
-
• Goroutine 分析:
-
• 读取goroutine指标时遍历各个 g,获取其栈信息后返回
